
Fitting Poly Water Tanks To Our Truck Camper. A Simple Solution.
Like most travellers, we needed to carry more water. Our Wedgetail Camper has a 90 litre poly tank and we knew we needed more. So where should we fit poly water tanks? Under the tray? Under the back seat? Somewhere else on the tray?
And why were we so keen on poly water tanks? Simple. They’re lightweight, cheap and last a long time. We had a stainless steel water tank custom-made for a camper trailer we once had. It was fantastic, however wasn’t cheap and was pretty heavy too.
Go here for a detailed comparison of what’s the “best” water tank for you.
Now weight’s not really a consideration for us with our Isuzu NPS, with a 7.5T GVM rating. Surprisingly, our biggest issue was finding a spot to install water tanks.
Where To Fit Poly Water Tanks?
Before we could decide where to fit water tanks, we needed to decide how much extra water we wanted. We can last a week on the 90 litre tank in the Wedgetail Camper, if we’re careful.
So we settled on the idea of doubling our water… plus a bit more so we could have an occasional shower. We wanted an extra 120 – 150 litres onboard.
Now if you look at our truck, this should be easy. Just hang them underneath, between the chassis rails. Hmmm, maybe not. You see, there’s all sorts of obstacles in the way.
Yes we could have fitted them there. However, they’d have to be custom-made. And custom-made equals expensive. And then we’d have to think about how to fill them, how to empty them and so on.
But for me, there was a bigger argument against mounting water tanks between the chassis rails. Flex.
Our tray is spring-mounted on six coil springs. The Wedgetail Camper is bolted to the tray and the tray is steel chequerplate, so it’s quite rigid. The coil springs allow the chassis to flex without fear of cracking or bending the tray.
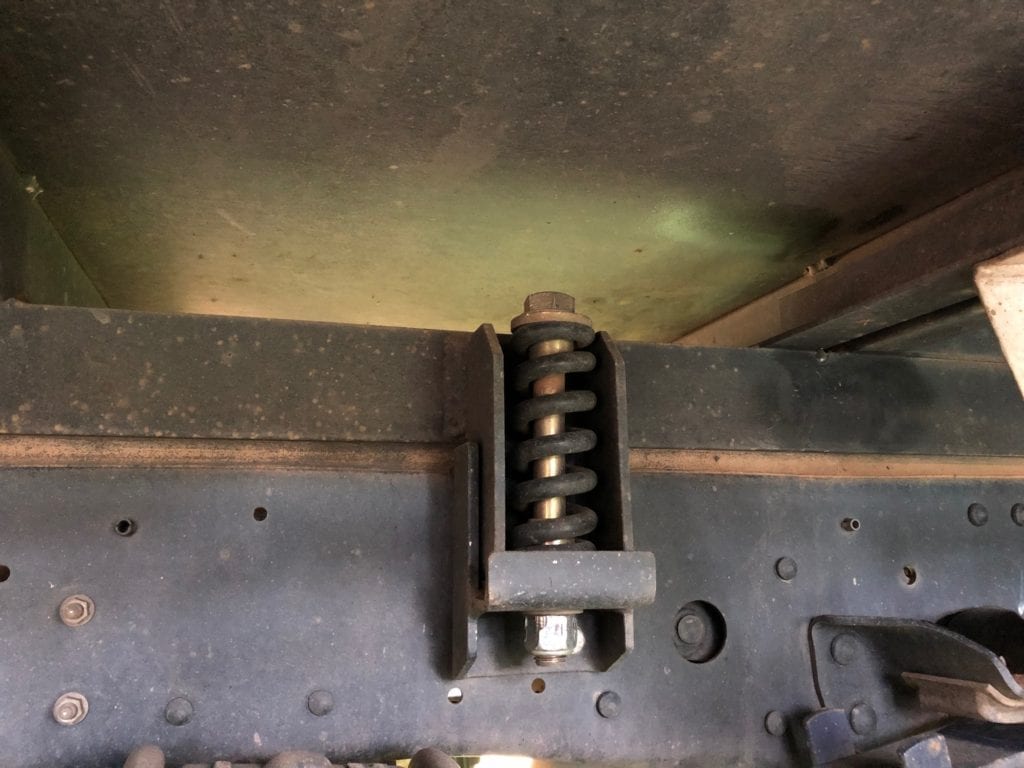
If we mounted water tanks between the chassis rails, they would have to be flexibly mounted so they didn’t twist and crack. This can get complicated… and expensive.
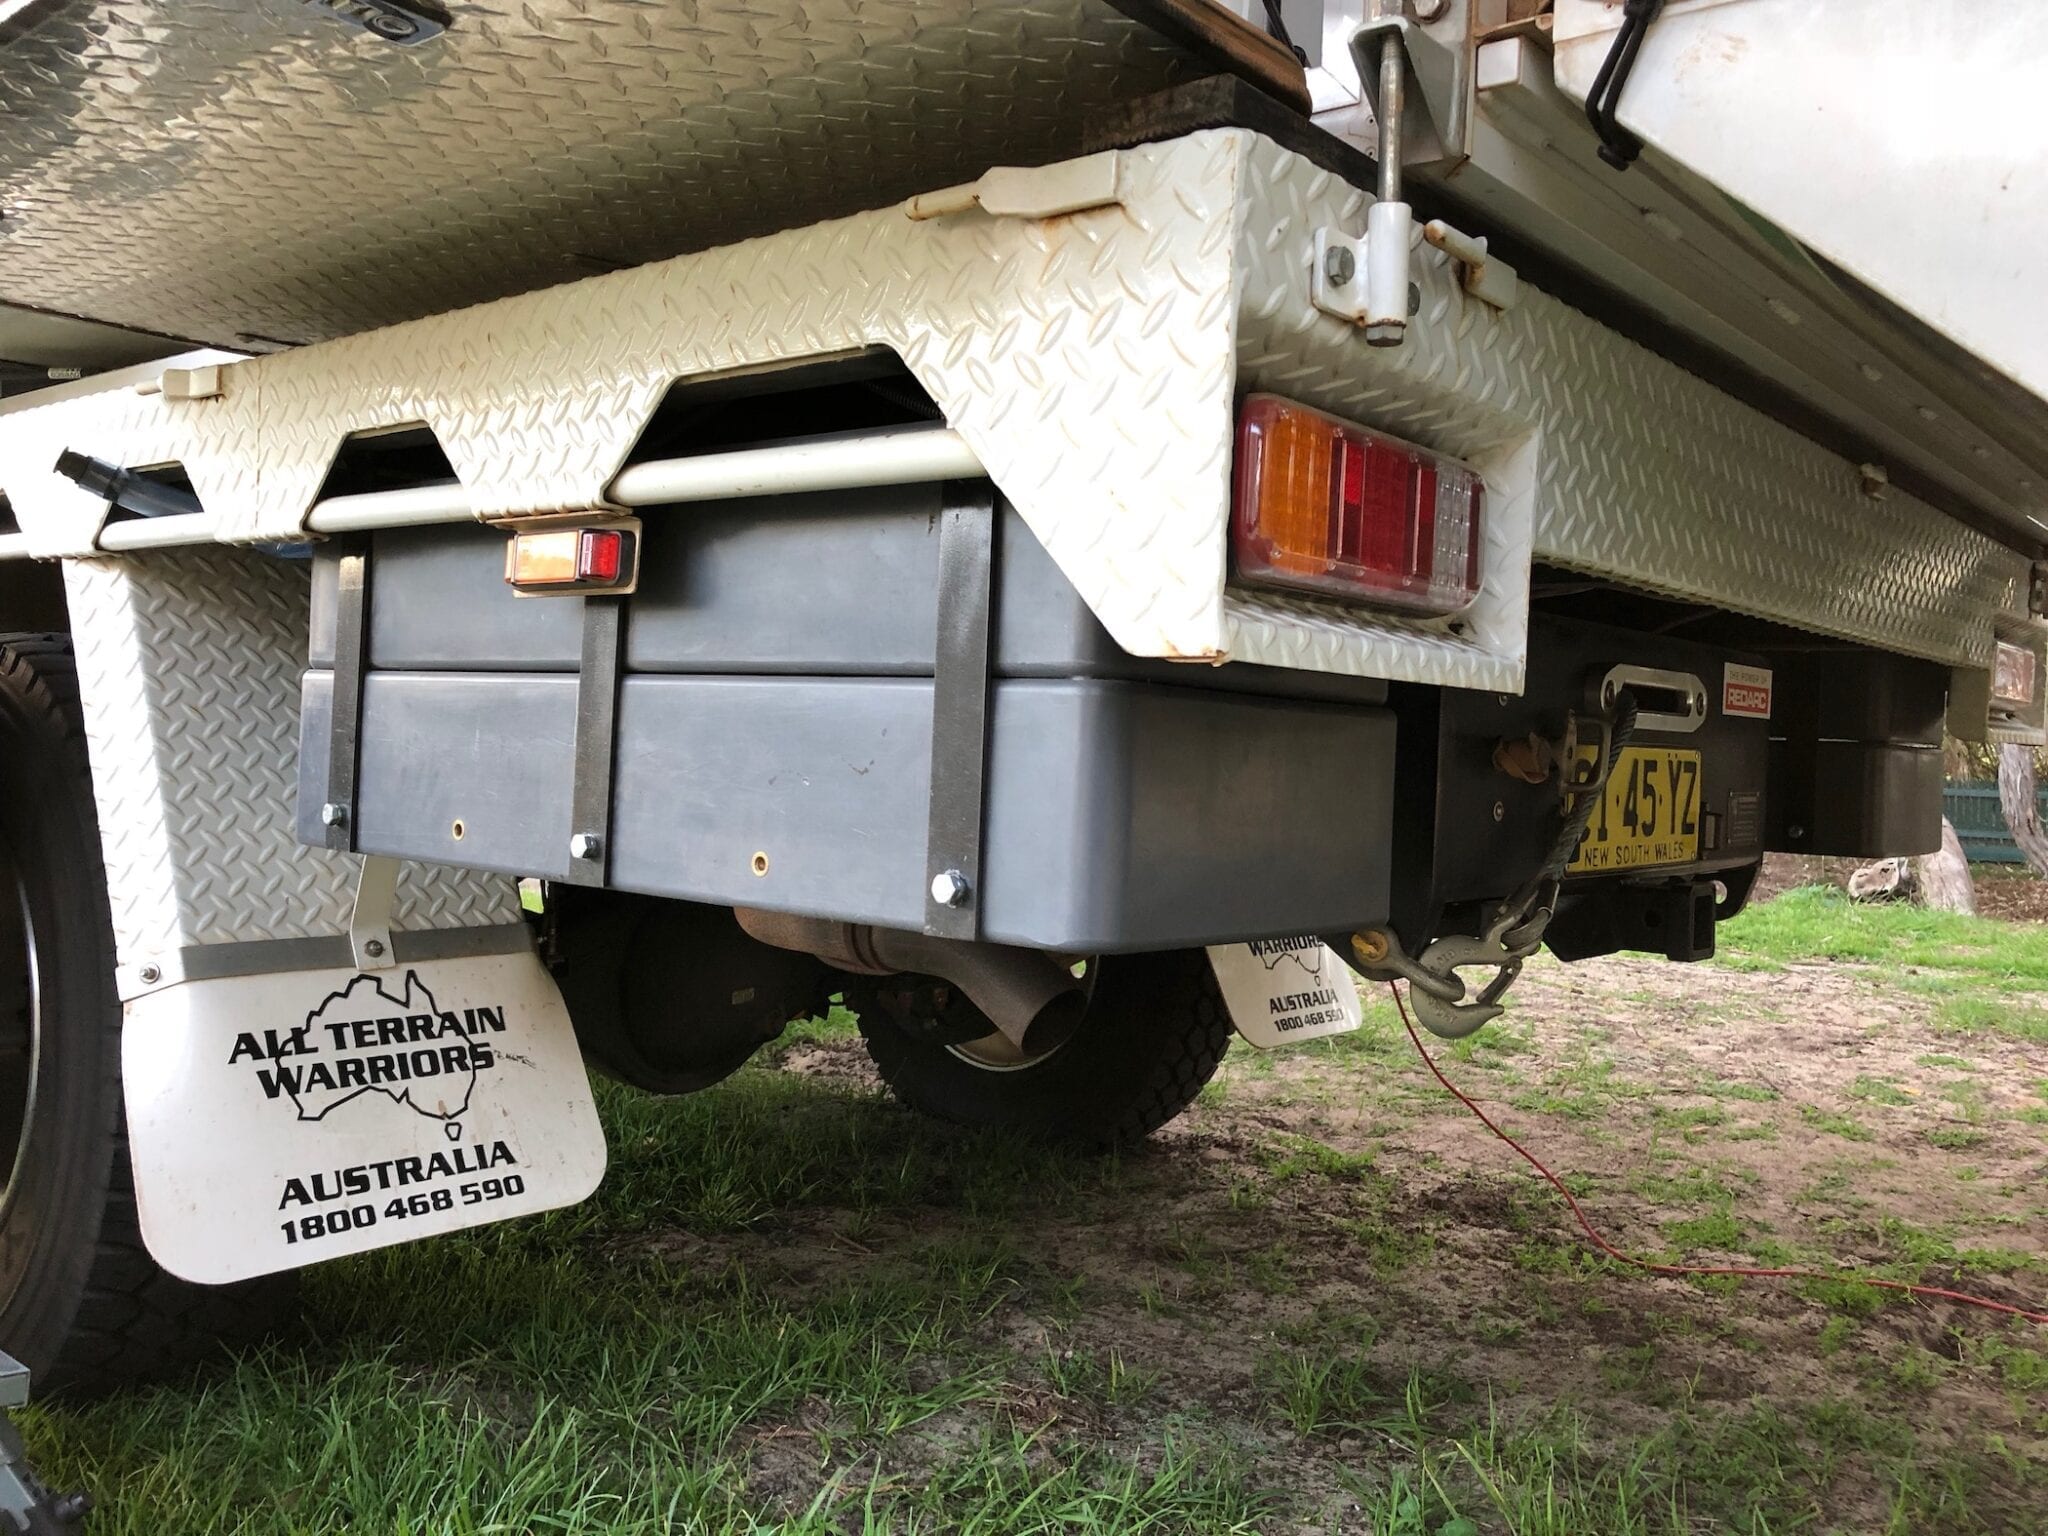
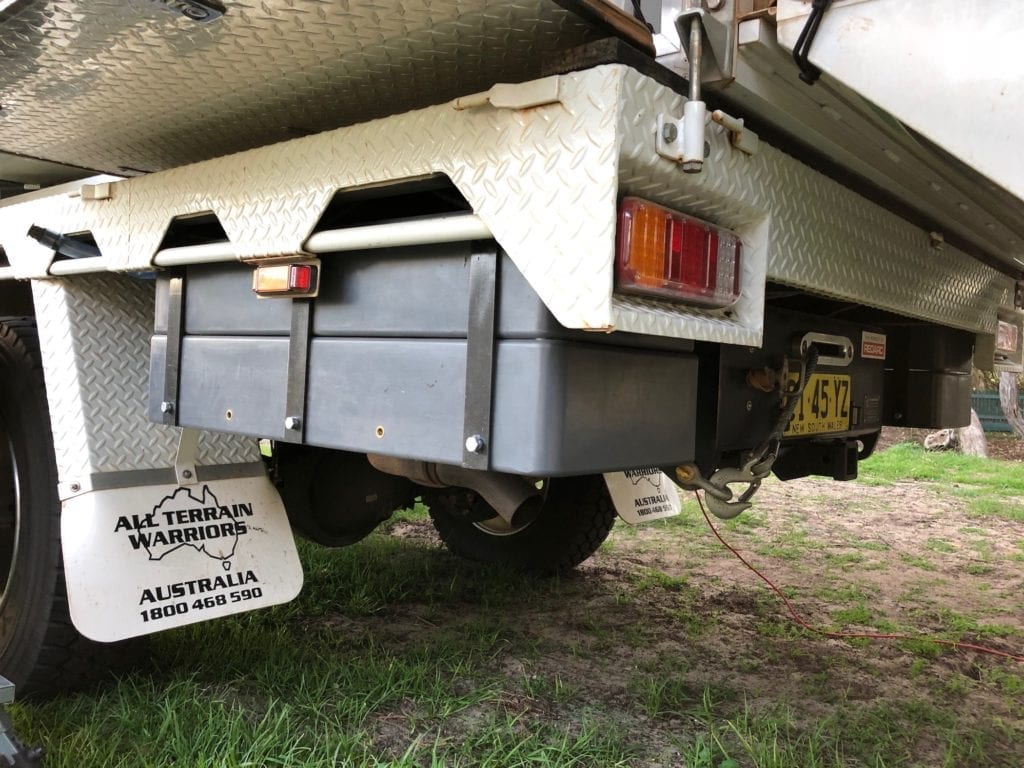
The most logical spot was behind the back wheels.
Using Standard Poly Water Tanks
We could have had tanks made to fit neatly behind the rear mudguards, angled at one end to match the angle of the mudguards. Indeed we did get a quote. However they were prohibitively expensive.
With a lot of assistance from Chris Campbell at All Terrain Warriors (ATW), we ended up with standard poly water tanks. These tanks are off the shelf and readily available.
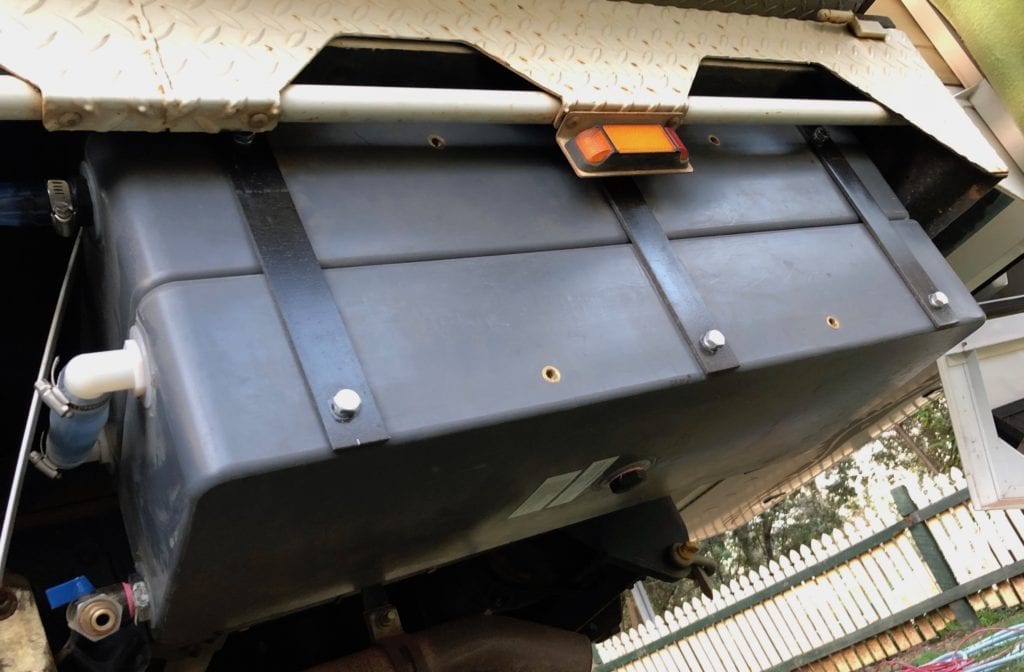
On each side we have two 40 litre poly water tanks, stacked on top of each other. This gives us a total of an extra 160 litres of water, give or take a bit.

Mounting them is easy. The tanks are supplied with M10 threaded inserts, five along each long side. So ATW simply made up flat bar brackets to hang vertically, and to pick up the existing threaded holes. Then they welded the brackets to the underside of the tray.
Once the poly water tanks are bolted in, the assembly is really strong. And the best part is, they’re tucked away up under the tray. They haven’t changed our departure angle at all.
Filling And Emptying – Keeping It Simple
We wanted to keep everything simple. We’ll normally fill the tanks from a tap, using a hose. Sometimes though, the drinking water tastes foul so we buy water.
The tank fittings are as follows (have a look at the photos to make this easier to understand):
- Each tank has 3 x 1” BSP poly threads. Two threads are at one end and the third is on top.
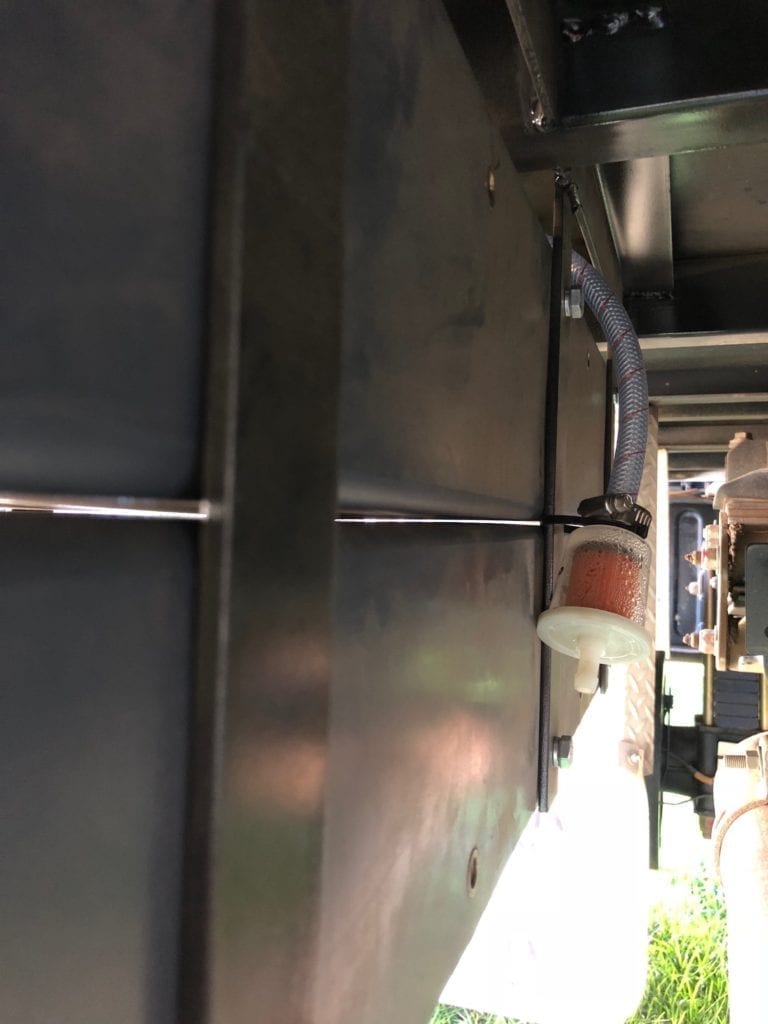
- A breather hose screws into the top thread in the top tank. A fuel filter at the end of the hose keeps out dirt and dust.
- The thread in the bottom tank is plugged.
- The tanks are connected with a clear hose. This doubles as a simple sight glass.
- An elbow with a ball valve is fitted to the bottom end thread of the bottom tank. This has a standard snap-on male hose fitting.
- An elbow with clear hose is fitted to the top end thread on the top tank. This is a filler hose. For now it has a bung to keep out dirt and dust.
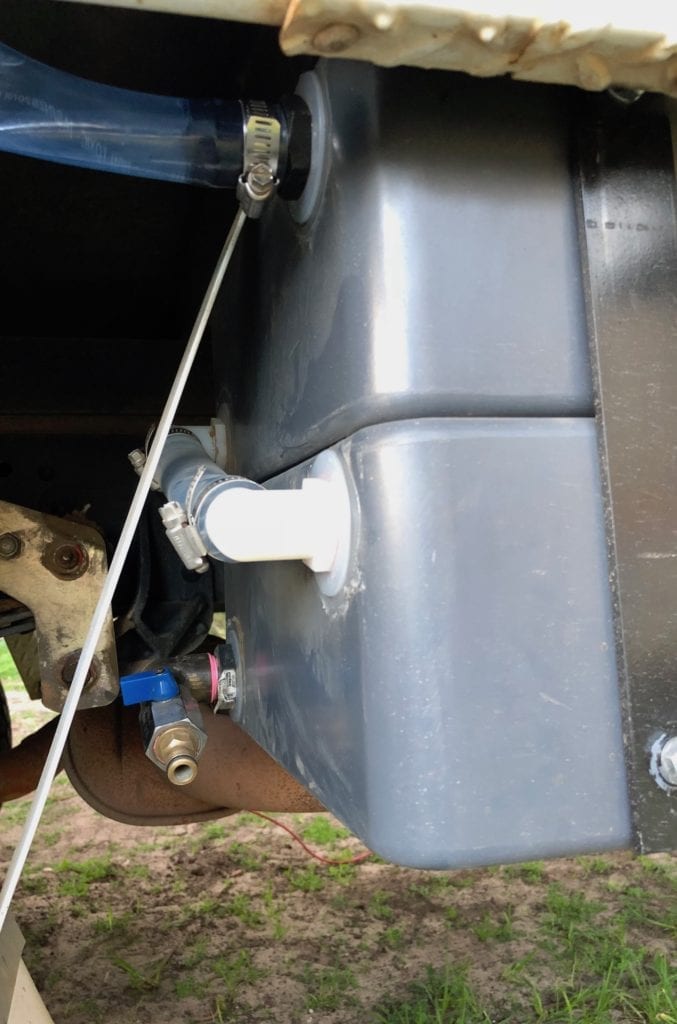
So we can fill each side with a hose. We just connect it to the bottom snap-on fitting and turn on the hose. When the water runs out of the breather, the tanks are full.
Filling from the bottom also pushes out all the air from the tanks.
We can also fill from the clear hose with the bung if we need to. This allows us to fill the tanks with a funnel and water container. We’ll replace the bung with a cap in due course.
Filling The Wedgetail Camper’s Tank
To get the water from the new tanks up to the poly tank in the Wedgetail Camper, I was planning to buy a 12V water pump.
The plan was to buy a pump rated at about 10 litres/minute, fit an Anderson plug to the cable and plug into our second battery system.
However, I decided to keep it simple instead.
After filling the Wedgetail water tank from the under-tray tanks manually, it has become obvious that this is the simplest setup. Here’s a video on how we fill the tanks.
As I explain in the video, by the time you get the pump and hose out, plug everything in, fill the tank then put it all away again, it’s just as quick to fill with a small jerry can.
The best part is, it’s simple. Nothing to fail or break down and no issues about where to store a pump, hose and fittings.
In Summary
So now we can carry (90+160) 250 litres of water. This will allow us to more easily travel to remote places and not have to worry about getting water. Plus we can fill and empty the tanks manually if we have to.
The set-up is really simple and strong. All Terrain Warriors did a great job of making the installation neat and simple to use.
Note: We are not affiliated with All Terrain Warriors in any way. This is an honest review of their poly water tank installation on our truck.

Get your Traveller’s Guides
… and a whole lot more at our FREE RESOURCES Page!
Any questions or comments? Go to the Comments below or join us on Pinterest, Facebook or YouTube.
Any errors or omissions are mine alone.
Go here for more How-To Guides and tips.
Thanks Warren!
I think there’s pros and cons for both types. I’ve done a more in-depth article on this here.
My personal preference is for stainless steel. However stainless steel work hardens over time and will crack if the tank hasn’t been made correctly. There’s ways around this, which I won’t go into here.
Regarding oxygenating the water, I guess it depends on how long you want to store the water for. If the tank has a breather I don’t think it would be an issue.
I’d be more concerned about nasties breeding in the water. We use a product from BioMagic called Water Pure. This keeps the water free of bugs for up to 12 months.
Regarding repairs, it depends on what the damage is. You can get metal and plastic repair kits. They’re two tubes you mix together and it sets hard. Perfect for emergency repairs.
However if a seam splits then a steel/aluminium tank will be easier to repair.
Hope this helps and thanks for asking. I’d do a more in-depth article on this topic soon!
Regards, Andrew
Hi guys, brilliant article article.
I have a quick question, i have been looking at many suppliers here in South Africa…..
My question is as follows which is BEST steel water storage tanks or plastic?
I have been reading up on the differences between the two types.
I mainly want to store water for a LONG period of time.
I have also heard that one needs to oxygenate the water as well? if stored for a long period of time?
Is this true or not? in which tank (steel water storage tanks / plastic) will oxygenating of the water be better / last longer. In this type of situation which would be best , steel water tanks, they last longer but can obviously rust, or plastic which dont last as long but are not prone to rusting or dents. Also which is easier to repair ?
I have been reading up mostly here and would like to know your feedback regarding
G’day, could you tell me what brand the poly tanks are as i think it’s a great basic idea for caring the extra water
cheers, Dave
Hi Dave,
Ours are Polymate water tanks. Here’s a link to a list of what tanks are available.
Cheers, Andrew
Having regard to the “foulness”of some water I am adding a domestic two stage (Five Micron) water filter which has 3/4 BSP fittings to my RV. Be very careful of overseas made stuff as they often use “NPT” (USA) thread sizes which are not compatible with BSP. My choice for hosing and connection will always be John Guest 12mm polyethylene piping and fittings.
True, although if you fill a water tank with foul-tasting potable water (eg some bore water), then that horrible taste will remain in your tank for a long time. And it’s very difficult to totally remove the taste.
The water filter does mask the taste, however it still doesn’t taste great. I guess it comes down to how fussy someone is about the taste – it’s an individual choice. We tend to buy water if the only other option is bore water.
Regarding fittings… good point. BSP and NPT are incompatible.
Cheers, Andrew