Note: This article contains an affiliate link to Outback Equipment. If you click through and make a purchase, we earn a small commission at no extra cost to you.
After three years on the road in our Isuzu NPS crew cab, we had a good idea of what worked and what could be improved with our setup.
It was time for a mid-life makeover!
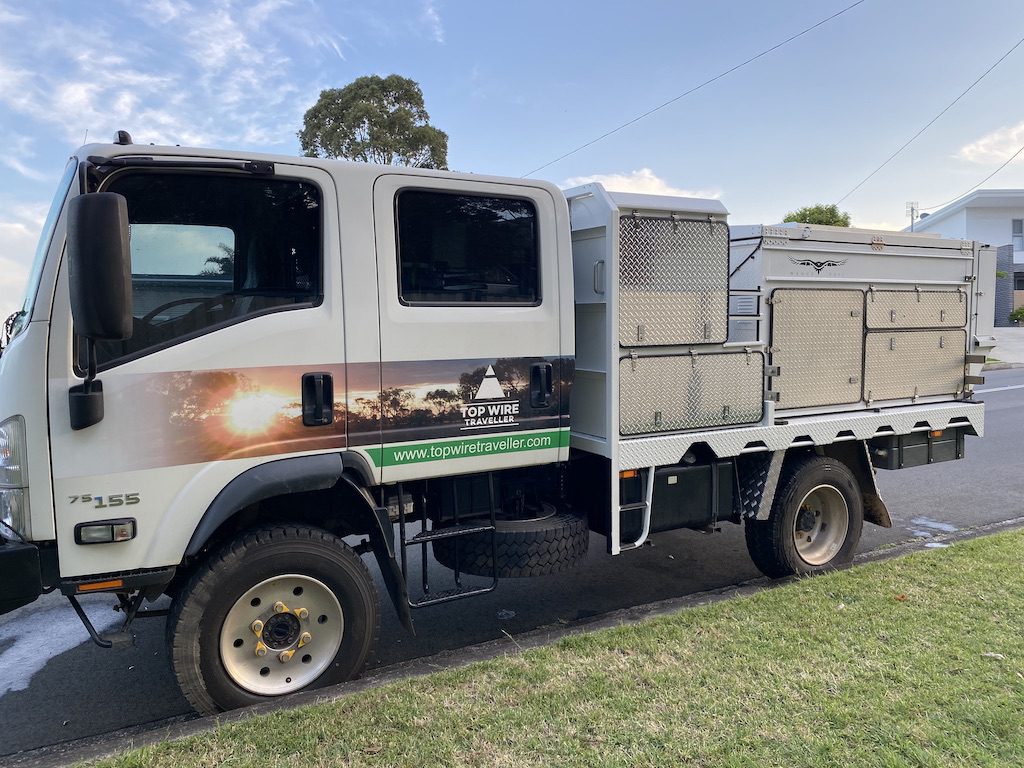
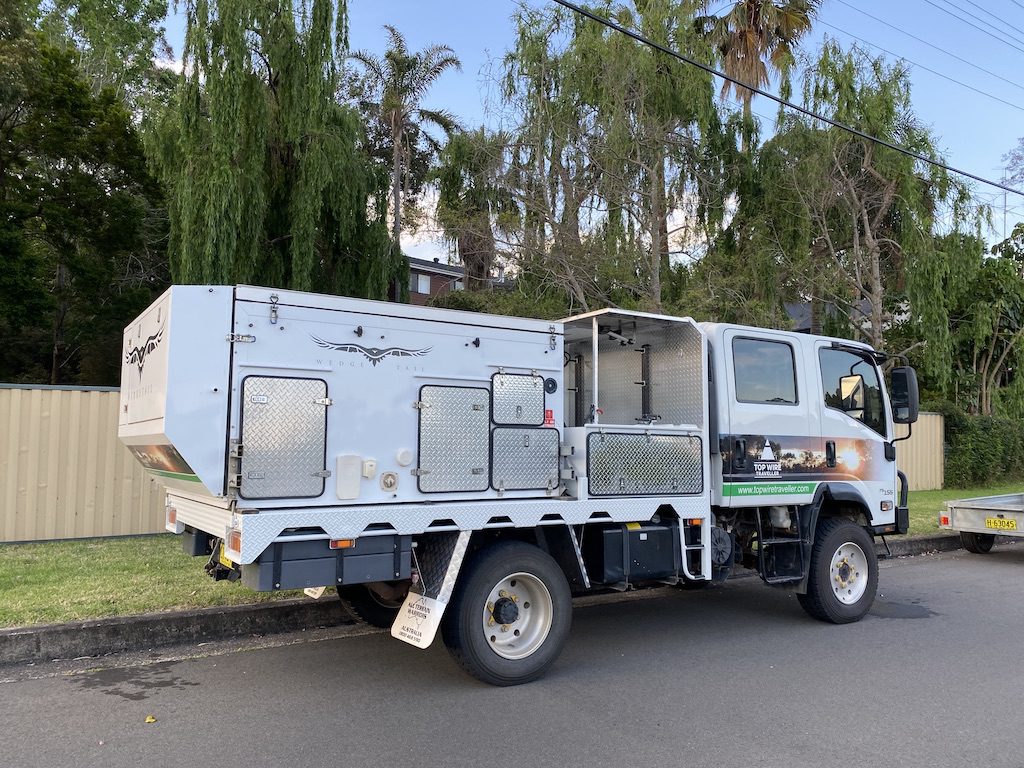
At the top of our list was the ability to carry two bikes, proper mountain bikes.
We had wrestled and fought a folding bike, but it was unwieldy and bulky. Worse still, it had an unhealthy liking for punctures if you rode over anything more sinister than a soft blade of grass.
Now you might think that with a small truck carrying a Wedgetail slide-on camper designed to fit on a ute, that we’d have plenty of room for bikes.
Other Wedgetail Campers owners fit fold-down bike carriers at the back. But we couldn’t do this.
As a 7.5 tonne GVM truck, it comes under strict heavy vehicle rules. And one of those rules is rear overhang… 60% of the wheelbase.
We were right on the length limits, so fitting a rear bike rack wasn’t an option. If we did, the heavy vehicle inspectors would have a field day. Besides, the last thing we wanted to do was put up a red flag to draw their attention to us.
But bikes weren’t our only reason for changing up our setup. The biggest driver was water leaks.
Those Troublesome Seals
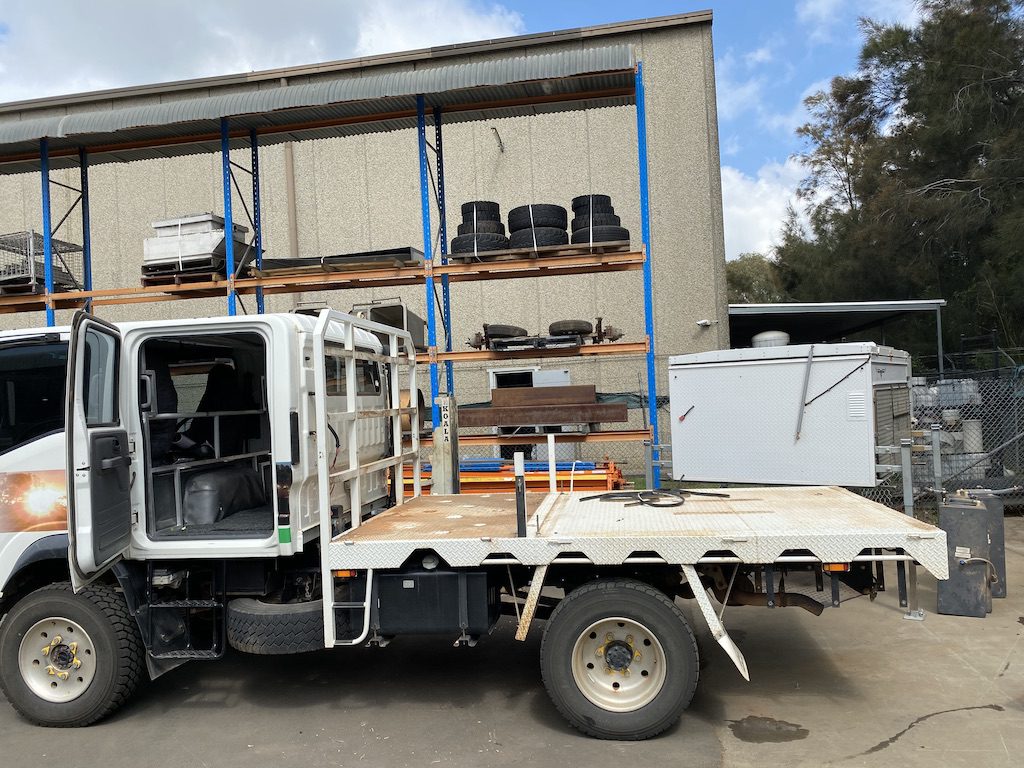
When All Terrain Warriors (ATW) built the truck, they built what we wanted. They had lots of fantastic ideas and suggestions, but I was pretty firm on the exact tray layout.
We wanted a steel tray, one that anyone could weld if we had an issue somewhere remote. Then we needed space for the Wedgetail Camper to fit at the back.
And finally, we wanted two separate storage boxes tucked in behind the headboard.
Originally the bottom storage box was to hold our two spare tyres… one each side. They’d be on slides, with a hand winch to lower each spare to the ground. However, ATW worked their magic and found space for one spare along the left hand chassis rail. We had one spare in the bottom box and a whole lot of extra storage space.
The top box was basic, just a rectangular box with a door on either side. I then fitted a dual battery system, added partitions and filled the space with storage tubs.
There was a small problem. How to get to the top box, since it was high off the ground? Well, the doors on the bottom storage box doubled as platforms and ATW fitted steps on the front corners of the tray.
This way we could open a bottom door, step up onto it and reach inside the top box from both sides.
But those doors were heavy… really heavy. Being 3mm thick mild steel, the doors weighed a lot! And really from Day 1, they never sealed well. Dust wasn’t an issue, it was rainwater.
The bottom boxes leaked in the rain. I spent ages (and many tubes of Silastic!) trying to find the leak, to no avail.
And I never did figure out where the leak came from, although I suspect the door seals were the culprit. The worst part was, it was inconsistent. After a week of heavy rain, they might not leak at all. But then after a small overnight shower, they’d be full of water!
Only the bottom box leaked… until the top one started leaking.
The bottom one I could deal with. It was stuff that could get wet. But the top box had a dual battery system and a whole lot of other gear which couldn’t get wet.
That was the final straw. It was time for a re-design. And along the way, somehow we’d find room for two mountain bikes.
Let’s Start with The Back Seats
Step one was the back seat. When the truck was about a year old, I had a box made and fitted by Glenn Steel Innovations (GSI) in Ingleburn, Sydney.
A quick plug here. GSI are a family-owned business, run by owner Glenn Sherwin and his son Ryan. They’re great people and have a really good team working for them… from boilermakers to machinists and everything in between. They can make anything in-house and their workmanship is excellent. A pleasure to deal with.
Then I had the seat base cut down by an upholsterer. This way, we had two single seats on the outsides and a large storage box in the middle.
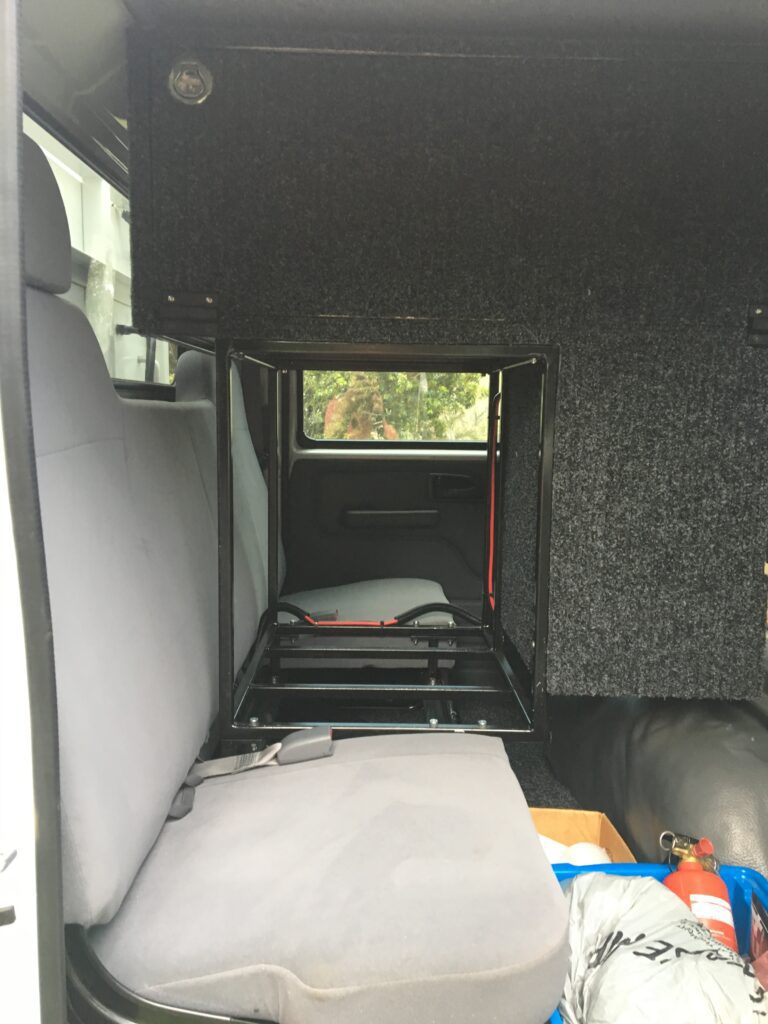
The idea was, we’d have room for our two adult kids if they decided to join us for a while.
But we never used them. The kids have their own busy lives and we had a whole lot of wasted space in the form of a humongous bench seat.
The other issue was, we wanted to get rid of the top box on the tray to make room for bike storage. But then we needed space for all the gear stored in that large box.
The obvious solution was to remove the back seat and fit shelving instead. I pulled the seat out and had the truck certified as a three-seater.
While it was stripped out, I added more floor insulation. This was simply cut-down windscreen sun shield. It’s perfect, aluminium either side with insulating air bubbles in between. It reduces heat ingress considerably.
A Storage Solution for The Cab
At this point, I took the truck to GSI. Marty and I finally came up with a set of shelves, after plenty of vague arm-waving and chin-scratching!
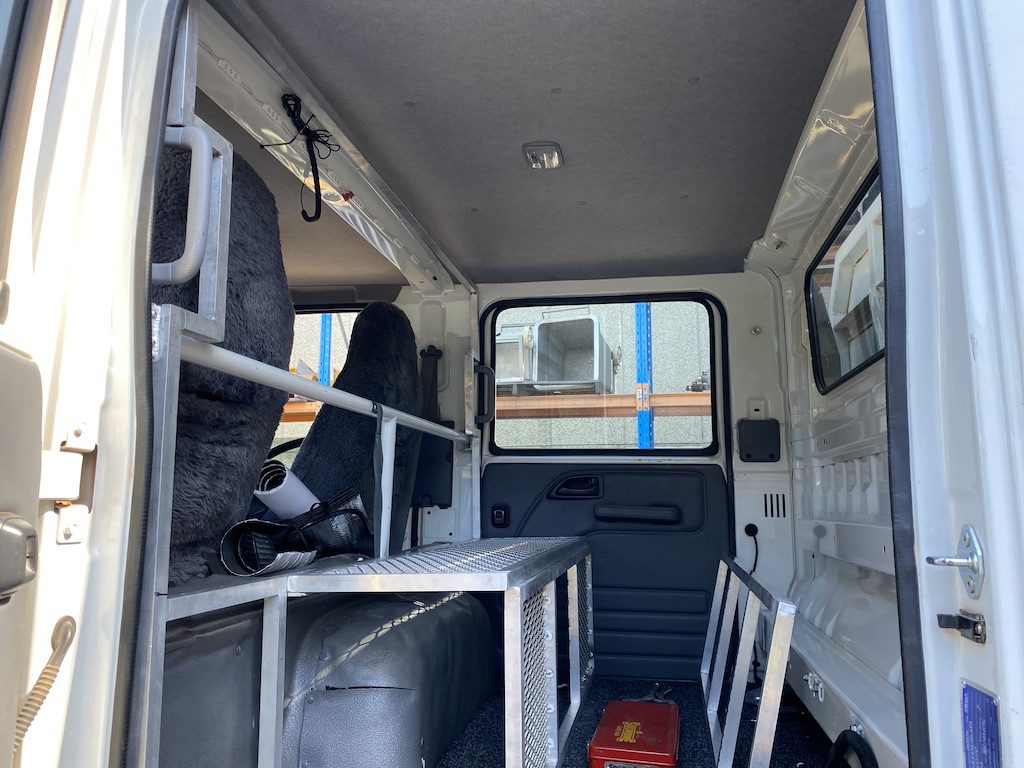
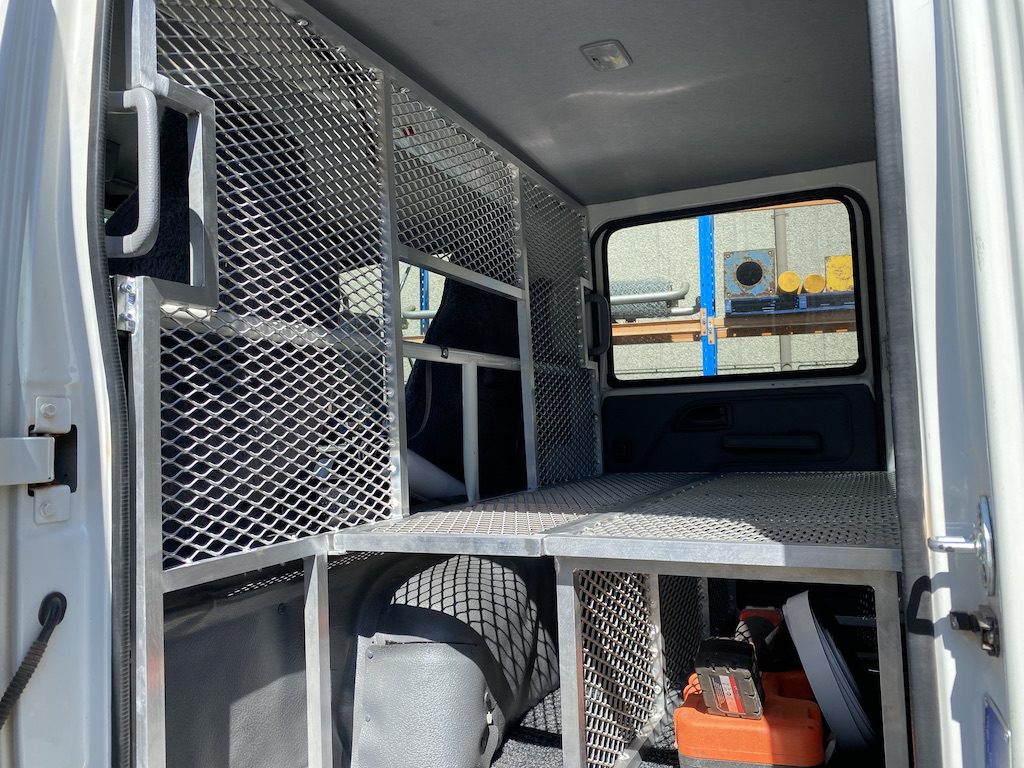
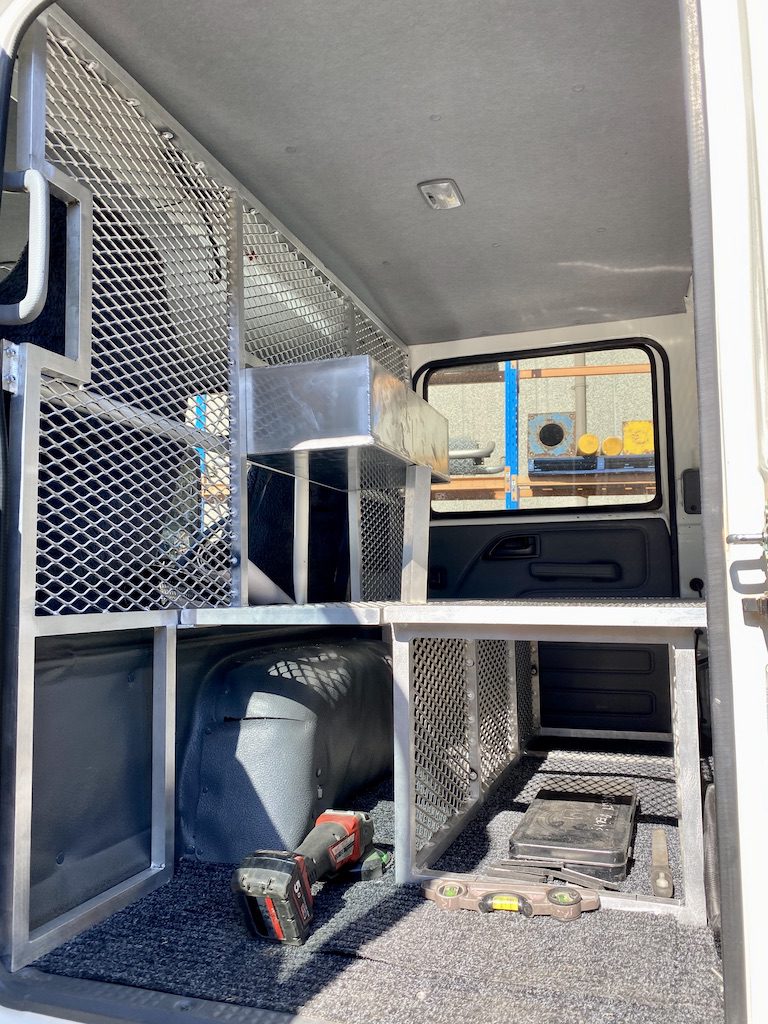
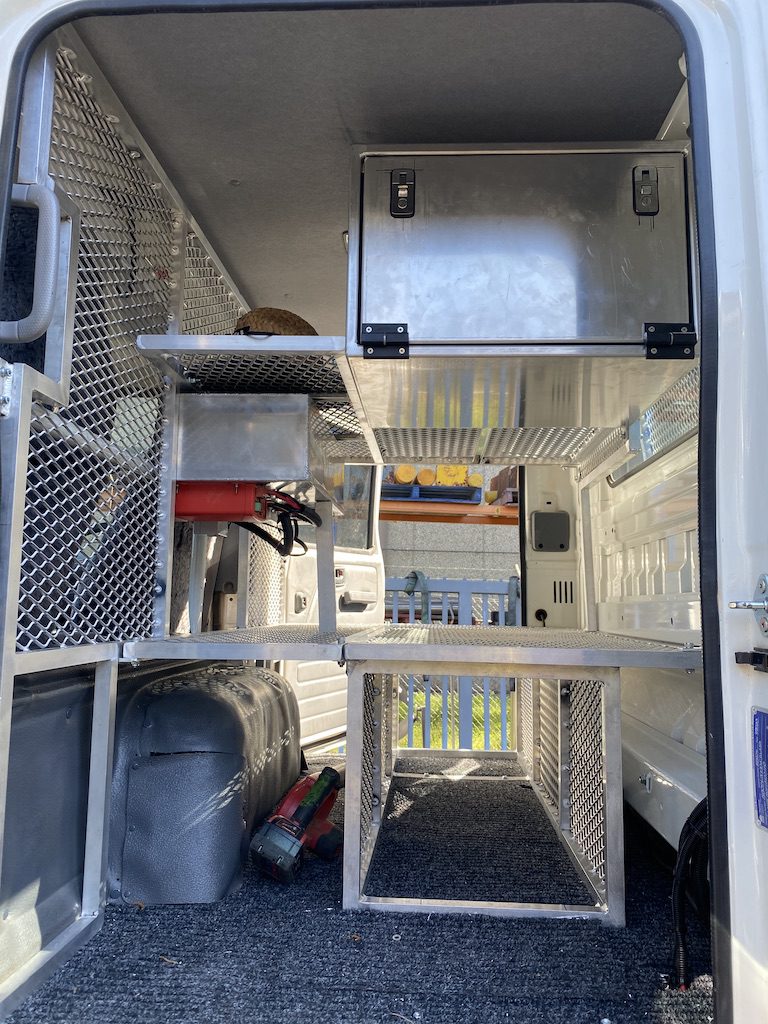
The shelf frames are aluminium SHS with aluminium expanded mesh for the shelves. We have a cargo barrier, storage alcove (“glovebox”) and two shelves… three if you include the floor.
One thing to keep in mind if you do a similar thing. In an Isuzu NPS crew cab, access to the rear of the engine is via a removable engine hump at the front of the rear seat area.
Whatever you do, allow access to this engine hump. This allows access to the final fuel filter and the whole hump unbolts when Isuzu adjust valve clearances every 60,000km.
This is super-important. Otherwise you’ll have one very cranky mechanic to deal with!
We solved it by making that section of shelf removable… take out four bolts, remove the shelf and the mechanic has free access to the hatch.
Mounting the Electrics
The next step was somewhere to mount our inverter, Cel-Fi GO, internal light switches, terminal block and USB ports.
The underside of the “glovebox” was ideal. Once I installed the electrical components, Marty from GSI made up a cover to protect them.
So now the electrics are tucked away safely from damage, have air space around them for cooling, and the inverter and USB ports are easily accessible from the front seats.
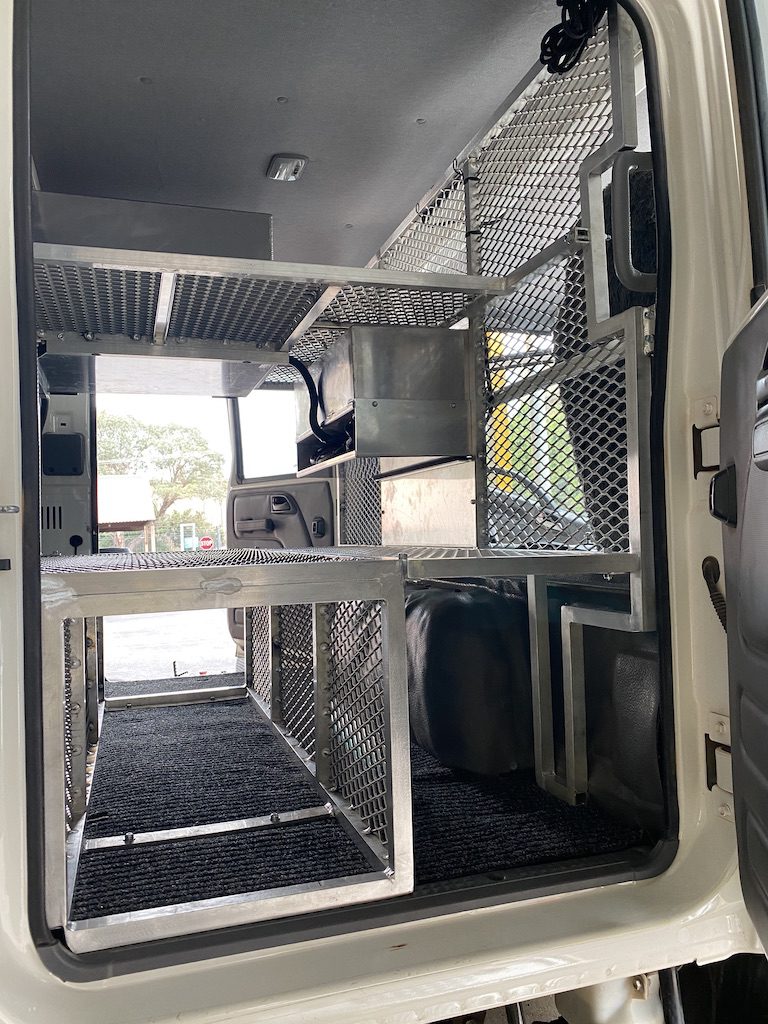
Next step was to re-run power to the terminal strip. So I used 25×25 aluminium SHS, bolted onto the underside of the shelving. Then I wrapped all the cables in corrugated split tubing.
The SHS “cable ducts” and corrugated split tubing protect the cables and prevent any rubbing.
A Rough Layout for The Tray
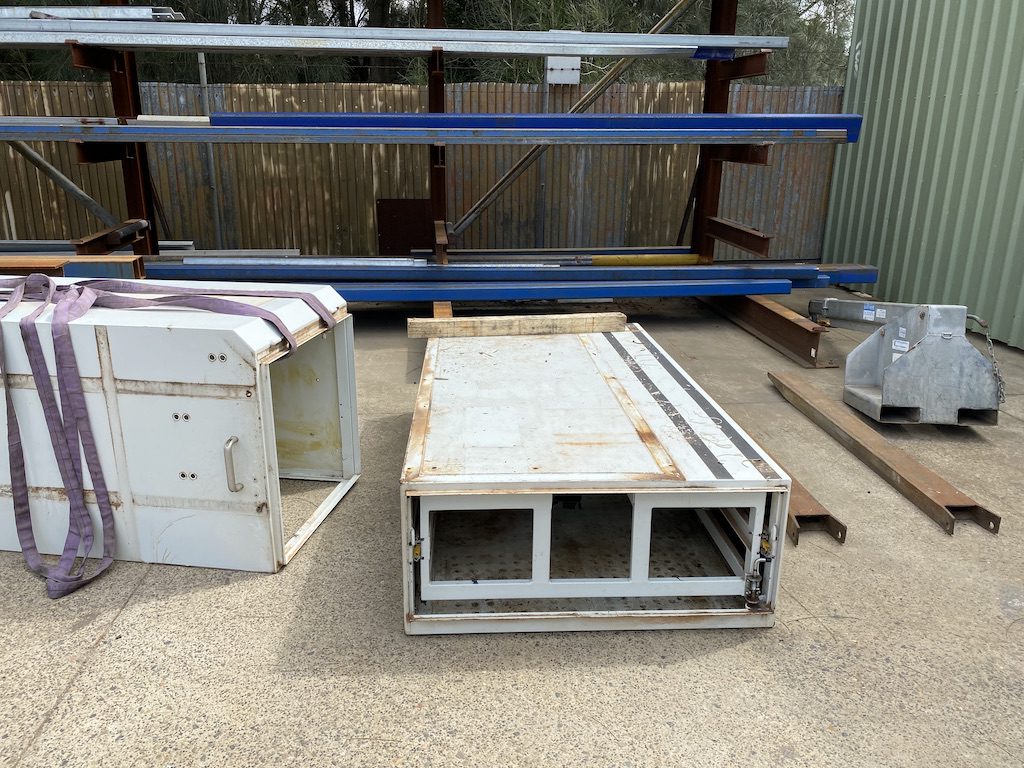
Here’s what we decided for the tray:
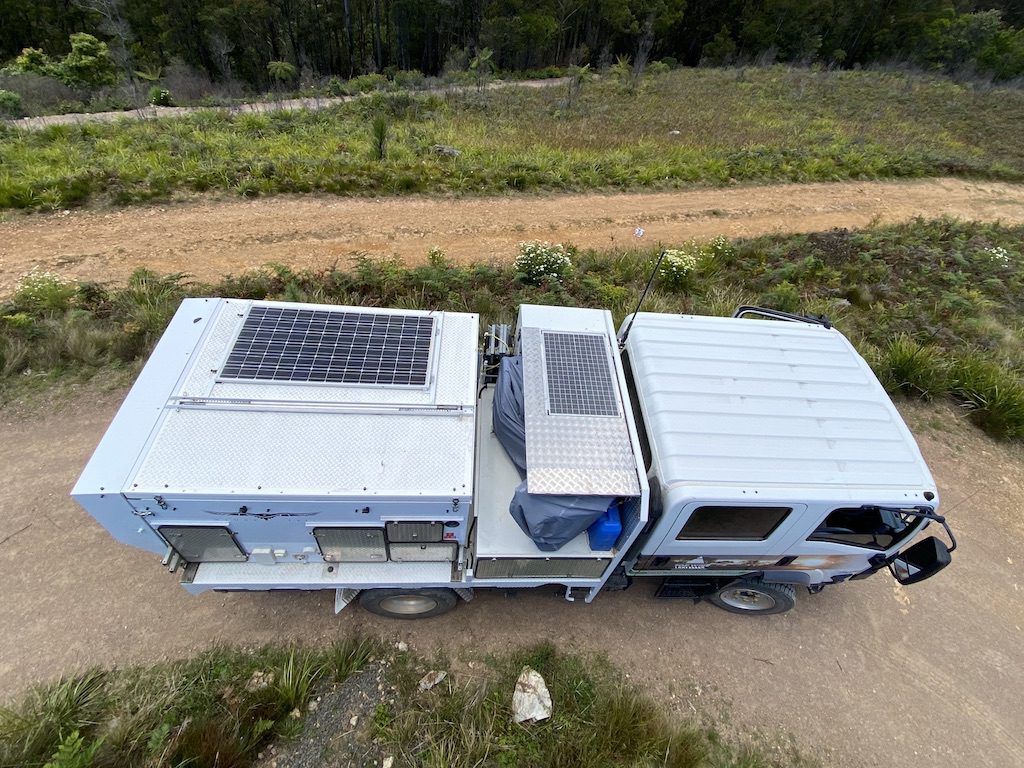
- Remove the top storage box. Cut it down so it was only large enough to house the dual battery system.
- Fully weld the shortened top box to the bottom box, on the left side of the truck. This would eliminate any possible water leaks.
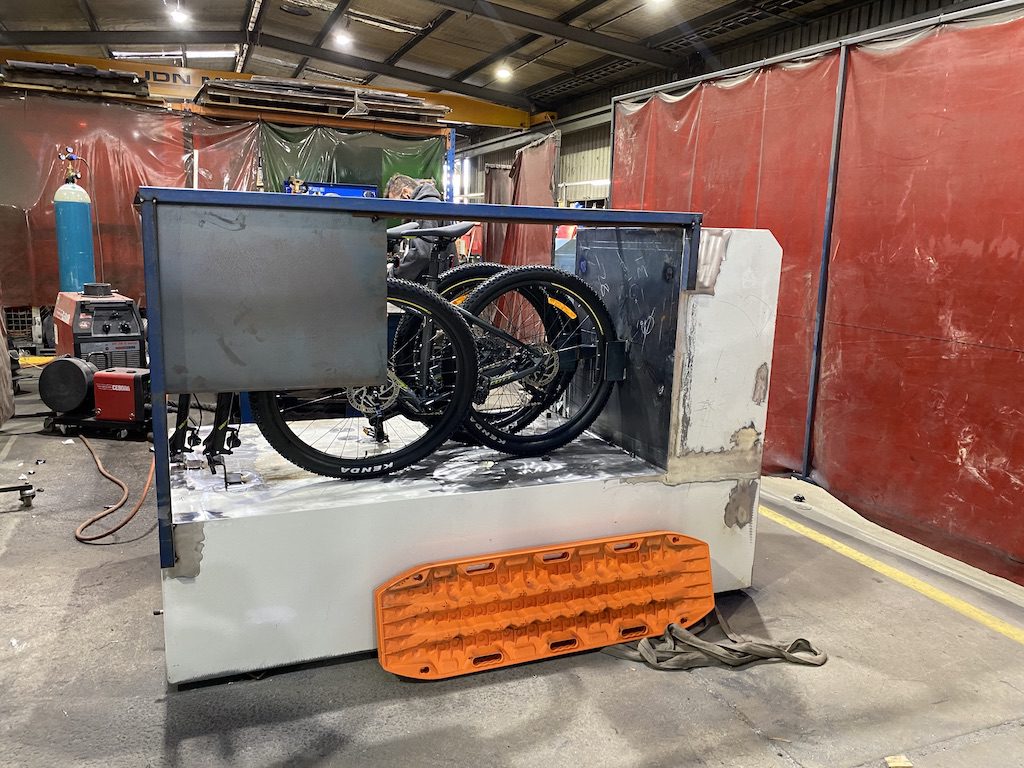
- Mount the bikes on top of the bottom box.
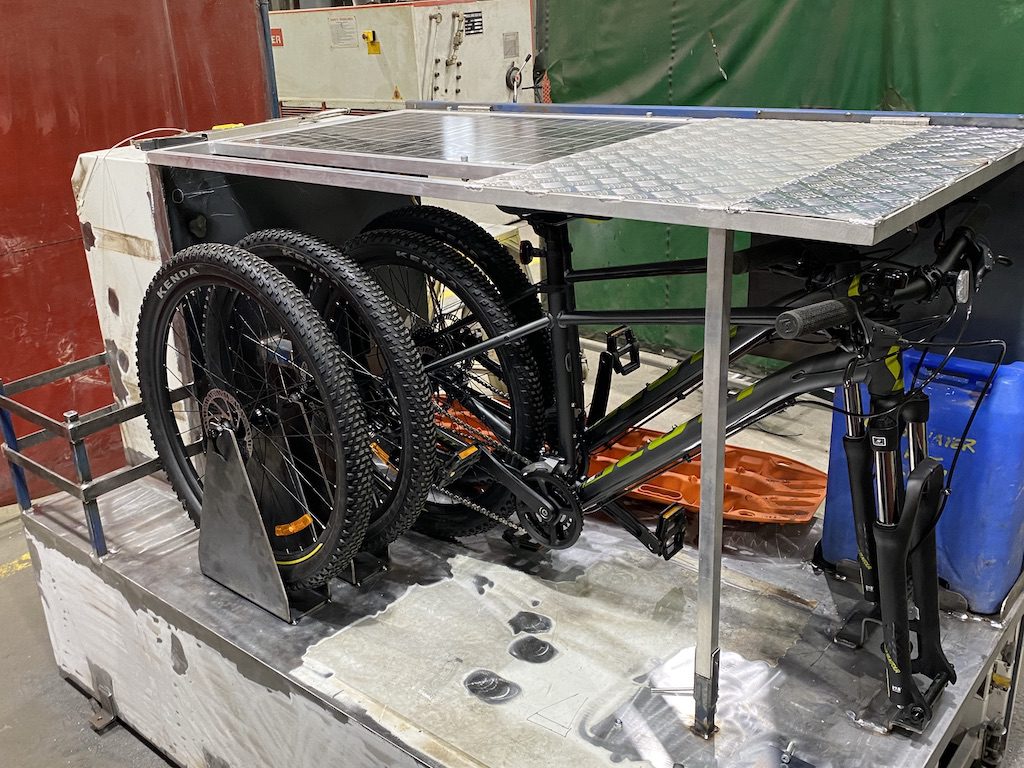
- Make a hinged lid over the bikes, which would also hold the solar panel.
- Fit one access door to the top box. This immediately eliminates 25% of possible water leakage via the door seals (3 doors instead of 4).
- Replace the heavy ATW doors with lightweight aluminium propeller plate doors from Wedgetail Campers.
- Flip the bottom box 180 deg. Previously, both spare tyres were on the left side. By flipping the box, we had more even weight distribution across the truck. The downside is the second spare has to be accessed from the right (road) side. But it’s an emergency spare, so rarely if ever needs to be used.
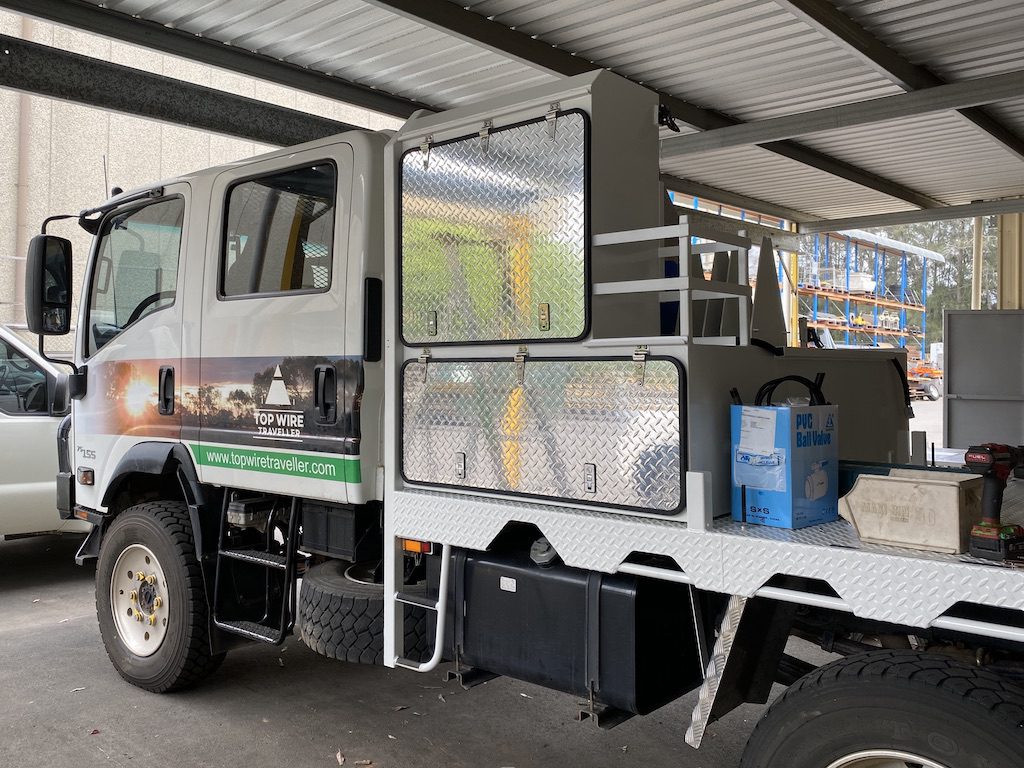
Why did we go with doors from Wedgetail Campers? Because they are absolutely brilliant.
We’ve pounded our Wedgie over the worst roads in Australia. Yet the doors have never leaked dust or water, buckled or failed in any way. They are an extremely simple and lightweight design, and are bulletproof.
Fitting Those Bikes
Fitting the bikes required a lot of thought.
One huge benefit of the original setup? The cab has always been the highest point of the truck. This means if the cab fits under an obstruction, then we know the tray will follow without incident.
This was something we really wanted to maintain. So, somehow we had to fit the bikes on top of the bottom storage box and make room for a solar panel as well.
By removing the bikes’ front wheels, we can just sneak the bikes under our height limit. Then the top lid covers the bikes, protecting them from the elements and giving us a place to fit the solar panel.
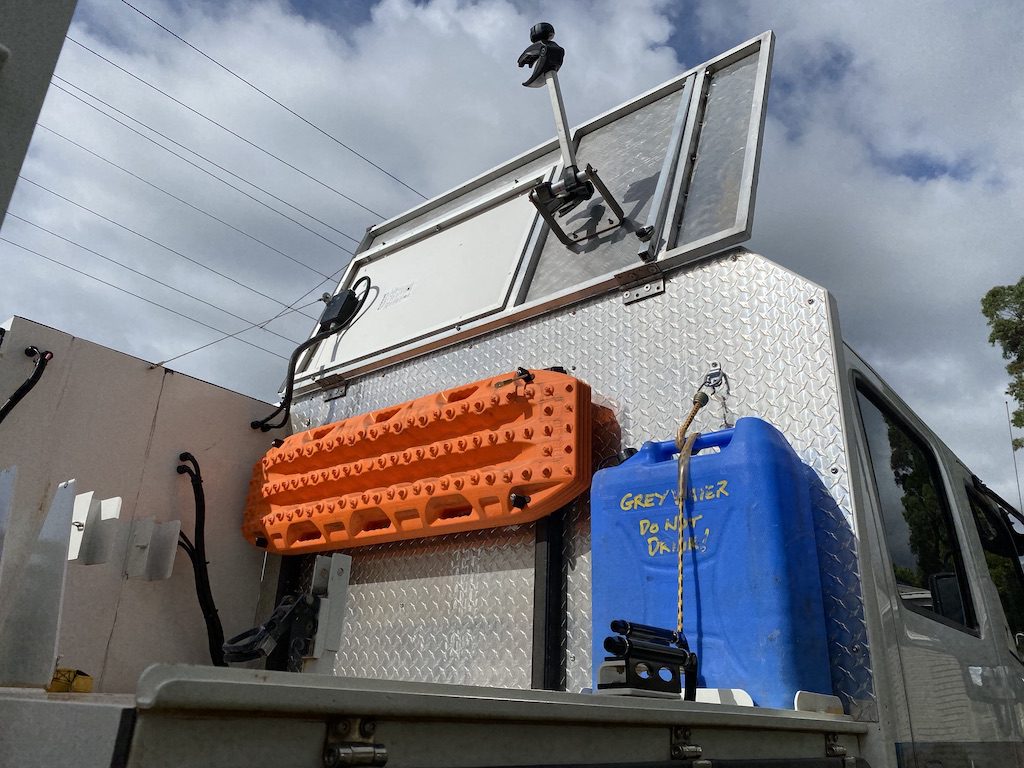
We bought a second-hand Thule bike carrier on Gumtree and used the locking clamps. These keep the bikes rigid and prevent them from being stolen. As a final security device, we run a lockable cable through the bikes’ frames and front wheels.
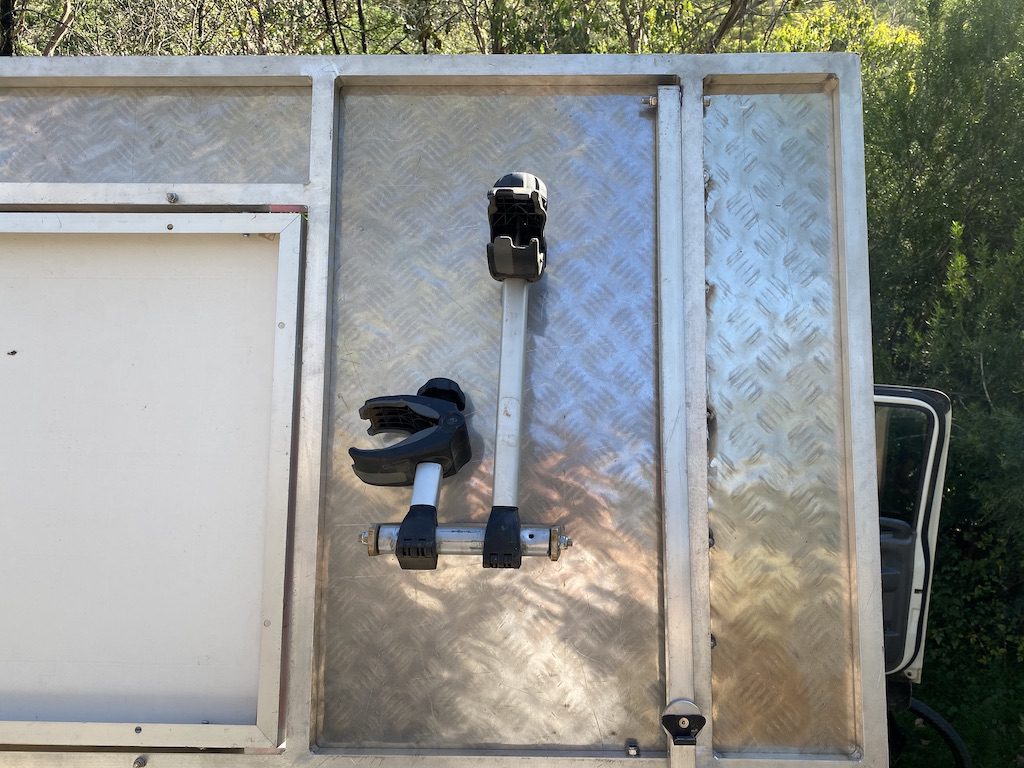
Our four Maxtrax were mounted on the back of the top storage box. Now they’re mounted against the headboard, under the folding top lid.
The outcome? We still have a setup where the cab is the highest point. Perfect!
Other Changes
With all the changes happening to the tray, we decided to remove it from the truck. While it was off, GSI repainted and tidied it up.
Here’s a summary:
- Removed the hinge pins for the side boards (which we never use).
- Sleeved the bolt holes for the Wedgetail Camper hold-down bolts.
- Relocated the water fill points for our under-tray water tanks.
- Permanently repaired a recurring minor weld cracking point on the underside of the tray.
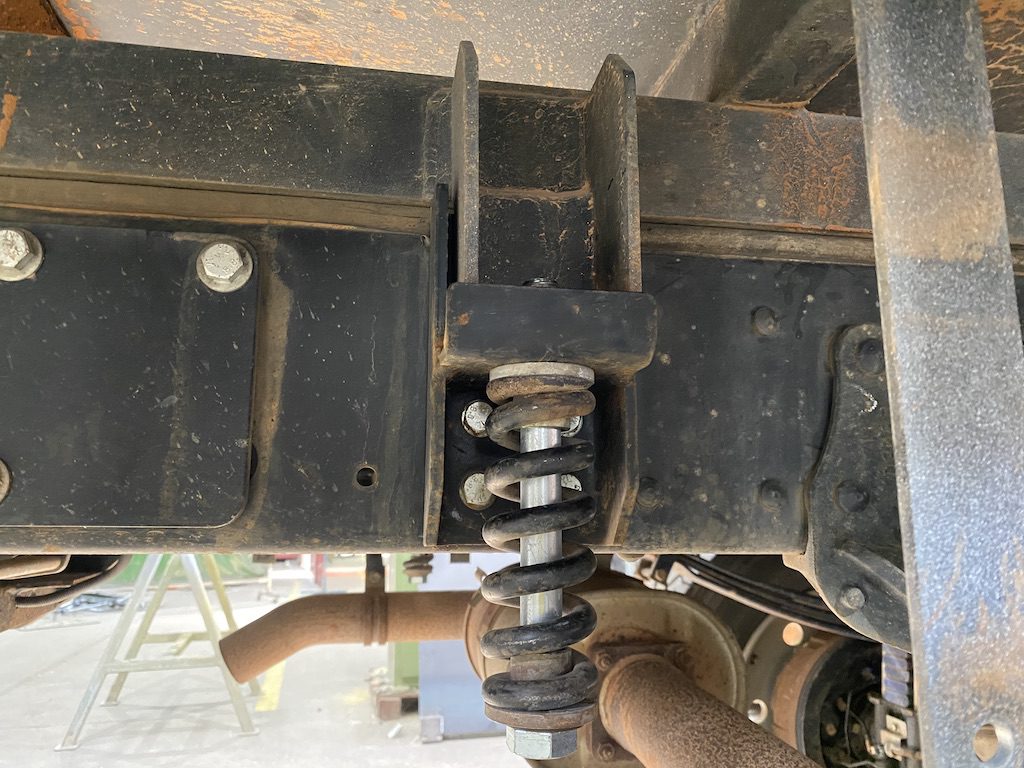
- Cleaned the tray’s spring mounts and fitted new bolts and locknuts.
- Refitted four of the six spring mounts upside down to stop stones building up in the springs.
- Cleaned out mountains of stones from inside the truck’s chassis rails.
- Replaced the heavy chequer plate steel mud guards with checker plate aluminium mud guards.
- Welded the tie-down rails to the tray on both sides (were previously riveted).
- Re-painted the tray.
A New Antenna Mount
With all these changes happening, it was a good chance to do something about our Cel-Fi GO antenna.
As highlighted in this article about installing the Cel-Fi GO, I had trouble positioning the original external antenna. The only solution was to fit a short antenna to the tray’s headboard.
You can buy a Cel-Fi GO package for Optus, Vodafone or Telstra here.
It wasn’t ideal though… now the antenna was sitting up high, waiting to be broken by a branch and the shorter antenna meant less mobile reception.
So I bought a folding GME antenna mounting bracket. GSI made a custom mount for it to fit neatly onto the headboard. This means we now have the original high-gain antenna, which we simply fold down when we need to.
Keeping It All in Place
The final step was to slot everything neatly into the cab storage shelves. This meant playing Tetris with a combination of different-sized storage tubs. After a lot of juggling, we had everything neatly stowed away.
To stop the tubs falling off the edges of the shelves, we then used bungee cord and lugs to hold them in place. A simple yet effective solution.
Surprisingly, everything stays in place… without any squeaking or rubbing.
We had expected a whole lot of annoying noises to emanate from the shelving. However it thankfully hasn’t been an issue, even on the roughest, most corrugated roads.
One final touch was to make a towel rack on either side, using bungee cord. This is a simple way to make a spot to hang your bath towel.
Weight Distribution
Prior to these mods, our weights were 3.8T over the back axle and 2.8T over the front.
We haven’t weighed it since the changes. However, there’s definitely more weight over the front axle. But we’ve also taken quite a lot of weight out of it. It’ll be interesting to see what the new weights are.
It’s fairly easy to throw too much weight over the front axle on an Isuzu NPS crew cab. The engine and the heavy cab don’t help here.
But we’re confident we’re still well under the front axle’s maximum weight. Considering it was 1,000kg heavier over the rear axle prior to the mods, it feels like the balance between front and back is about right.
What’s obvious is the improved ride. There’s much less of the “nodding dog” effect, especially on rough tar roads. The extra weight seems to have settled the truck nicely.
So, were the changes worthwhile?
A Big Improvement
Definitely. Apart from solving the water leaks, the whole layout works so much better. We now have easier access to everything – which makes life easier when you’re on the road. There’s nothing worse than having to unpack half the truck just to find one small thing.
The storage shelves in the back seat area work like a charm. And all that extra mass fills the space nicely. So the air conditioner doesn’t struggle as much on those really hot days.
The bikes take a bit of time to get down. But we use them constantly. It’s so handy to have two mountain bikes on hand when we’re parked up for a few days.
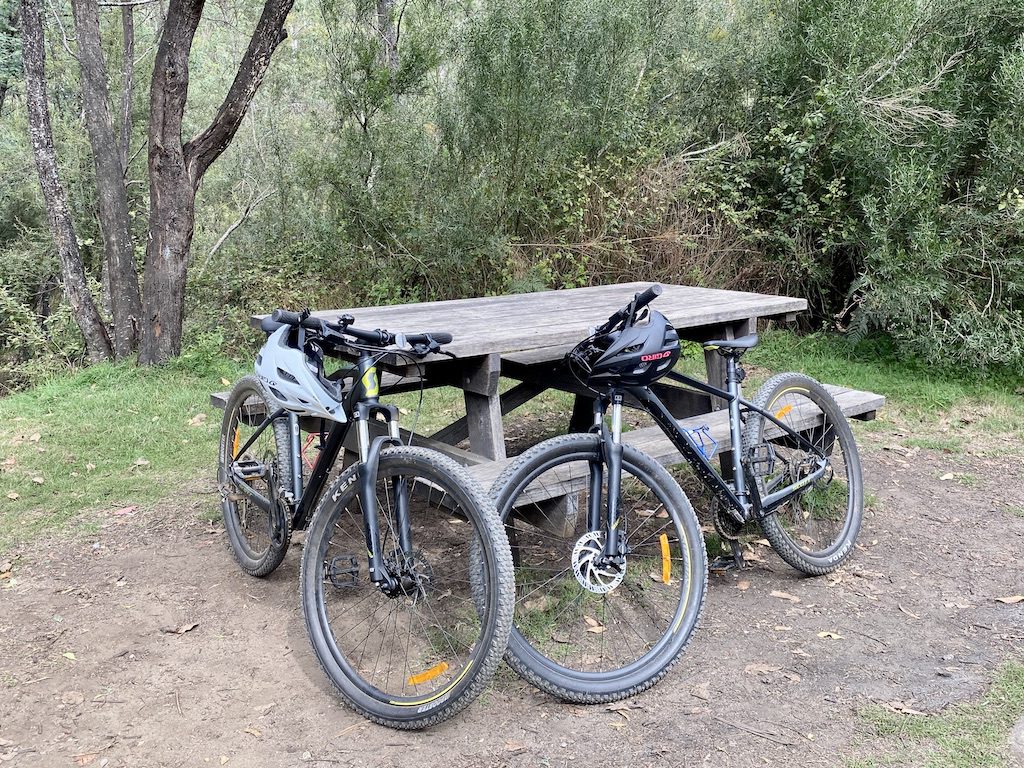
Whether we’re stuck in a town at a caravan park, or camped in the bush… those bikes get plenty of use. And it’s so good not to fight with a temperamental folding bike and its equally temperamental tyres!
Now, where can we fit more firewood…
I highly recommend GSI for mods like ours. They’re great to deal with and their workmanship is top notch. Give them a call on (02) 9829 5072 or contact them here. (Full disclosure: We’re not affiliated with GSI in any way. However, I did update their website for them a few years ago.)
Go here for more Reviews on our 4×4 Isuzu NPS truck.
The 8 Things You Need to Live Off-Grid
Make sure your new camper or van has these 8 essentials…
Any questions or comments? Go to the Comments below or join us on Pinterest, Facebook or YouTube.
Any errors or omissions are mine alone.

Can you post some photographs of the completed truck with new Wedgetail doors on tray. Both sides please.
Hi Chris,
Just added a driver’s side photo (at top of post).
Cheers, Andrew